


By Mike Samer I Co-Founder
Kayaking in La Jolla can be a bit intimidating, especially if it’s your first time! Whether you’re joining us on a tour or trying to learn more before going out on your own, we want to make it as easy as possible to learn to kayak. Here are 10 tips to get you started! Whether you’re joining us on a tour or trying to learn more before going out on your own, we want to make it as easy as possible to learn to kayak. Here are 10 tips to get you started!
1. Know which type of kayak is right for you
- Recreational Kayak: These models are wide and stable, which makes them great for beginners or anyone who needs a steady ride, like photographers. They are shorter than other types, which makes them much easier to turn. Recreational kayaks excel on calm, flat waters.
- Touring Kayak: Longer and thinner than recreational models, these are great for people with more experience who want a higher performance. Although their length makes them a bit harder to turn, they allow you to go faster with the same amount of energy, which increases your range. Touring models are less stable than recreational ones, but they typically handle waves and currents better, so they perform well for ocean kayaking.
- Whitewater Kayak: Unlike the long, flat hulls of boats designed for the ocean and lakes, these are rounded on the bottom and shorter for maximum maneuverability. You wouldn’t want to take one of these onto a lake, but you wouldn’t want any other type on a rapid-moving river.
- Crossover Kayak: Each of the previous types is designed for a specific type of water, but crossovers are intended to give a balance between recreational, touring, and whitewater models. These are amazing for beginner sea kayaking because they’ll give you the stability and control you need in both waves and calm waters. At Everyday California, we use crossovers for all of our tours and rentals.
Sit-in or Sit-on-top: Kayaks can be further broken down into these two types. Sit-in models have a hollow space in the hull, so your legs will be inside of the boat. These can be ideal for cold water, because they can help keep you dry. Sit-on models will leave your legs exposed, but they’re generally a lot more stable, and much easier to get back into if you capsize your boat. Our crossovers are all sit-on-top models.

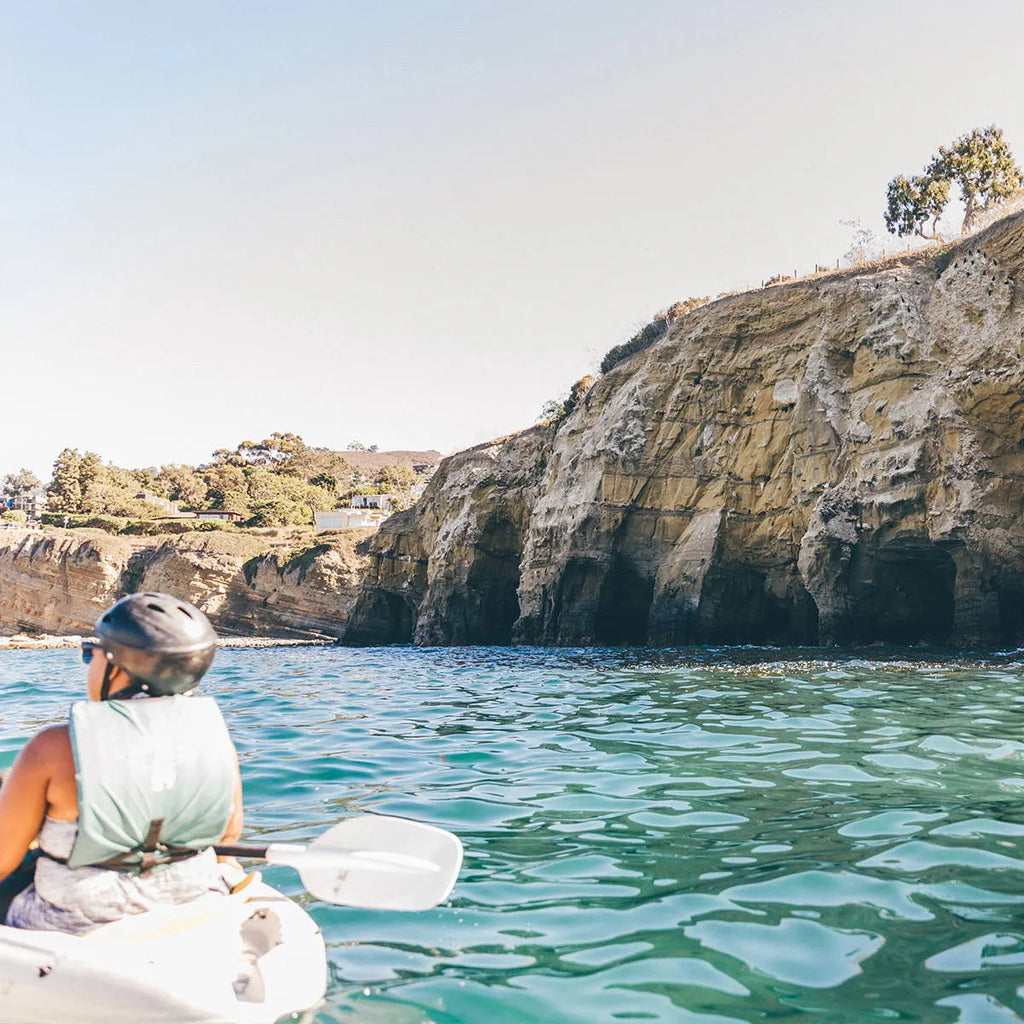
2. Make sure you have the proper kayaking safety gear
When you’re in the ocean, the two most essential pieces of equipment are a Personal Flotation Device (PFD) and a helmet. The most common PFD is a U.S. Coast Guard-approved type III or type V life vest, and there are products specifically designed for sea kayaking. A PFD is needed any time you’re in a vessel, but if you’re going to be in a small watercraft where there are waves, a helmet is also essential. If you get caught by a strong wave and your kayak flips over, it can turn into a 60-pound, fast-moving projectile aimed directly at your head. If that happens, you’ll be glad you have a helmet on. If you have storage space in your hull, it’s also a great idea to include a first aid kit and a flashlight for signaling.
3. ...And the proper attire
It might be a sunny, warm day, but don’t forget about the ocean temperature! Especially if you’re using a sit-on-top kayak, you’ll be getting wet, so you might need a wetsuit. In the summer, when the air and water are warm, you might be fine in a swimsuit or a shirt and shorts. We recommend avoiding cotton clothing, which will absorb the water and keep you wet the whole time. Long-sleeved rash guards are perfect because they’re durable, quick-drying, and protect you from the sun. Also, wear sunscreen! But please make sure it's reef-safe.

4. Be familiar with your paddle
Kayak paddles have two sides: the scoop and the spine. The scoop is the concave side that curves inward, and the spine is the opposite side with a ridge running along its length. When you’re paddling forward, you’ll hold the paddle with both hands at an equal distance from the center, a little more than shoulder-width apart, with the scoops facing you. Keep your arms extended in front of you, not pulled tight into your body like T-Rex arms. There’s a reason you don’t see many Tyrannosauruses kayaking today: their arms aren’t long enough for good technique (okay, there might be two reasons).
5. ...And know the basic kayak paddling techniques!
Forward Stroke: You’ll be using this one the most. To move forward, you’ll submerge the blade into the water next to your feet and move the paddle back along the side of your kayak. Don’t just rely on one arm at a time to paddle. While you’re pulling with one arm, you’ll push with the other, while twisting your body to bring power from your chest and core.
Reverse Stroke: To back up, you’ll do the forward stroke in reverse. The important thing to remember is that the spine follows the direction of travel, so you’ll need to flip your paddle around.
Draw Stroke: If you need to move sideways, you’ll extend the paddle a few feet directly to your side. Angle the blades so that the scoop is facing towards you, and pull directly towards your body.
Sweep Stroke: If you’re trying to turn while keeping forward momentum, just use a forward stroke on one side of the kayak. If you want to turn while keeping stationary, you’ll need to use a sweep stroke. Instead of pulling the paddle directly alongside the boat, you’ll use a wide, arcing sweep through the water.
6. Know how to kayak through waves
Once you get into the calmer, deeper water of the ocean, it’s very similar to kayaking on a lake. But close to the shore where the waves are breaking, you need to take extra care.
Paddling out can be difficult because you have to fight against the waves. If you have a choice of where to launch your kayak, spend some time looking at the ocean and seeing where the water is the calmest. You’ll also want to wait for the calmest conditions before you try to paddle out. Large and powerful waves tend to come in sets of 3 to 10, but in between the sets are lulls: periods where the water is calmer and the waves are smaller. You’ll have much more luck if you wait for a lull than going out in the middle of a set.
When you’re paddling out, always try to keep your kayak pointed straight at the wave. If you are turned to the side, you’ll risk turning and flipping your kayak. If a large wave approaches, lean forward as it hits, and keep paddling until you’re well past the breakers. When you’re paddling in, you should also keep your kayak straight and wait for a lull, but you should be leaning back instead of forward. When you make it to waist-deep water, jump out and pull your kayak into the sand.
Safety tip: If your boat flips and you fall into the water, always try to keep the kayak between you and the beach to avoid getting hit.
7. Know your local kayaking area
Different beaches can have different conditions, so be sure to do some research into your location. Try to figure out where the best place is to launch, when the best time is, and if there are any hazards or restrictions once you get into the ocean.
We make it easy at Everyday California with a designated boat launch area, and if you stop by our shop, we can always pull up a full map of the area to show you where you should and shouldn’t take your boat.
8. Share a tandem for your first time kayaking
If you’re an adventurous, independent person, you might be thinking that a single kayak is the way to go, but we always recommend a tandem for your first time out. It’s definitely an experience we think is worth sharing, and with two people in the same boat, it’s safer, easier to paddle, and easier to get back in if you capsize.
9. Know how to get back in if you flip over
A lot of first time kayakers are worried about capsizing, but it’s usually not too difficult to get back in. The first thing you need to do is flip your kayak back over, which is done by swimming to the side, reaching across with both arms to grab the opposite side, and pulling towards you. Then, reach across again to grab the opposite side and pull your body up until your belly is over the seat. Scissor kicking with your legs can help boost you out of the water. From there, just flip yourself over and swing your legs onto the kayak, and you’re ready to start paddling again.

10. Take a kayak tour!
Everyday California’s tours are the perfect introduction to ocean kayaking. We provide you with all of the safety gear you need, give a quick lesson, and help you out with any questions or concerns that you might have. We also have extra people on the beach to help push you past the waves, and if you flip over, our tour guides will be right next to you helping you back in. Even if you have absolutely no experience, our expert staff will make sure that by the end of the tour, you’ll know everything you need to start kayaking on your own.